
 As an alternative to pure black and white you can use Split Toning in Photoshop. In this example you can see that the black has a blue tint, and the white has beige tint. Split toning with two colours is also called Duotone.
First convert your image to black and white. This is not a prerequisite.
Then add an Adjustment Layer called Gradient Map. Click in the field marked with a green arrow and your Gradient Editor opens.

In the Gradient Editor, set the four points marked with red arrows.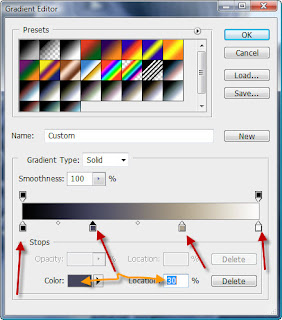
The leftmost point already exists, but must be set to black (#000000).
The second point you have to create and set to 30% (shown). Click in the blue field to select your colour (#45475d).
The third point you create and place at 68%, then select your beige (#afa18d).
The rightmost point already exists, but must be set to white (#fcfcfc).
Press OK and your split toning is applied.


No comments:
Post a Comment